Overview Link to heading
The audience for this guide is for beginner, but not an absolute beginner: This guide assumes that you are familiar with the following:
Software Basic terminal usage, including using a text editor and installing software through
apt. Hardware Basic understanding of interfacing with Raspberry Pi gpio.
This should work on any raspberry pi. I only tested with a 4B and Zero 2 W. For this guide I used the latter.
This was my software setup:
         _,met$$$$$gg.           user@pi
      ,g$$$$$$$$$$$$$$$P.        OS: Debian 12 bookworm
    ,g$$P""       """Y$$.".      Kernel: aarch64 Linux 6.6.51+rpt-rpi-v8
   ,$$P'              `$$$.      Uptime: 12h 33m
  ',$$P       ,ggs.     `$$b:    Packages: 1594
  `d$$'     ,$P"'   .    $$$     Shell: bash 5.2.15
   $$P      d$'     ,    $$P     Disk: 5.4G / 15G (39%)
   $$:      $$.   -    ,d$$'     CPU: ARM Cortex-A53 @ 4x 1GHz
   $$\;      Y$b._   _,d$P'      RAM: 137MiB / 416MiB
   Y$$.    `.`"Y$$$$P"'
   `$$b      "-.__
    `Y$$
     `Y$$.
       `$$b.
         `Y$$b.
            `"Y$b._
                `""""
🔴 This is a continuation of a previous tutorial for setting up the SSD1351 display. It is required to have the screen setup with the framebuffer driver before this section of the tutorial, so check it out if you need to!
Drawing on the screen Link to heading
🟡 I explain a lot here, if you just want something to work you can just get the code from gitlab
The Linux framebuffer device makes it trivial to display images with some scripting. Run fbset to get the color format and screen resolution for the framebuffer:
fbset
This is my output:
user@pi:~ $ fbset

mode "128x128"
    geometry 128 128 128 128 16
    timings 0 0 0 0 0 0 0
    nonstd 1
    rgba 5/11,6/5,5/0,0/0
endmode
Let’s break down the output: Link to heading
We really only care about mode and rgba for now. The other values can be ignored. If you want to know more about the fbset command then read the manual, or run man fbset.
- From
modewe can find the resolution is128x128. - From
rgbawe see5/11,6/5,5/0,0/0. This is a common color format. Let’s go over what that means.
For any image we need to know intensity of the 🟥 red, 🟩 green, and 🟦 blue colors of each pixel. By combining these values we can get most every color. I say most every color because modern pixel displays are limited by their precision or really, how many bits each color uses. If 8-bits (1 byte) is used, then each color can have 255 values, where 0 is 0% color, and 255 is 100% color. If 16-bits (2 bytes) are used then that number goes up exponentially to 65536 distinct values, which is much higher precision. In the table below, You can see that you have a lot more distinct values:
| precision | max value | step-size |
|---|---|---|
| 8-bit | 255 | 0.36 % |
| 16-bit | 65536 | 0.0015 % |
That’s cool, but what does 5/11,6/5,5/0,0/0 mean? Let’s break it down.
- Commas separate values, so
5/11is 🟥 red,6/5is 🟩 green,5/0is 🟦 blue, and0/0is alpha (transparency). - Taking
5/11for 🟥 red as an example, the first value5is the number of bits that will be used for that color, whereas11represents how many bits the value is shifted up. For 🟩 green it uses6bits and is shifted up5bits, 🟦 blue uses5bits shifted by0, and alpha uses0bits shifted by0bits (AKA, it’s unused so we will ignore it). - We add together:
-
5bits for 🟥 -6bits for 🟩 -5bits for 🟦
- Together:
5 + 6 + 5 = 16 bits (2-bytes), for each pixel.
If that’s confusing, hopefully this visual representation below will help:
| Bits | 0 | 1 | 2 | 3 | 4 | 5 | 6 | 7 | 8 | 9 | 10 | 11 | 12 | 13 | 14 | 15 |
|---|---|---|---|---|---|---|---|---|---|---|---|---|---|---|---|---|
| 🟥 | 🟥 | 🟥 | 🟥 | 🟥 | 🟩 | 🟩 | 🟩 | 🟩 | 🟩 | 🟩 | 🟦 | 🟦 | 🟦 | 🟦 | 🟦 |
🟢 Fun fact, green gets an extra bit to double its resolution since the human eye can see more green.
Putting it all together Link to heading
So we need to give the framebuffer a 128x128 image in that 5/6/5 color format above. We could use an image editor like GIMP to create this type of image, but it would be far more useful to have an automated way to create this type of image.
To convert an image we need a way to take jpeg or png image as an input, convert it to 128x128 raw rgb image, then convert the color format to 5/6/5 as above.
To do the initial conversion to a 128x128 raw rgb image, we can use ImageMagick. Install it in a terminal:
sudo apt install imagemagick
Before we start let’s make a directory to keep everything contained:
mkdir ~/image-converter
cd ~/image-converter
Now lets get an image. Either pick your own image and put it in the ~/image-converter project directory or get one through wget, let’s download this little freak and name it tux.png:

# Store in tux.png
wget -O tux.png https://upload.wikimedia.org/wikipedia/commons/thumb/3/35/Tux.svg/1200px-Tux.svg.png
Let’s write a command to resize the image and convert it to a raw 🟥🟩🟦rgb using ImageMagick:
convert tux.png -resize 128x128! -depth 8 rgb:tux.rgb
Let’s break down the command:
convert: ImageMagick command-resize 128x128!: Resize the image to 128x128 pixels. The!tells ImageMagick to resize to exact dimensions, even if it distorts the image.-depth 8: Use 8-bits for each colorrgb:tux.rgb: Output as raw RGB image, with a file nametux.rgb
You can see that we use 8-bits for each color, and not the desireed 5/6/5 bit desired format. Unfortunately, ImageMagick can’t output an image in that format, so we use the next highest value, 8-bits. Instead tux.rgb can be treated as an ==intermediate== image, that needs to be converted to 5/6/5 bits.
Python Script Link to heading
I found the easiest way to convert to the 5/6/5 color format was either ffmpeg or a custom script. Since ffmpeg is way too much for this, let’s use a python script. Use Your favorite text editor and create/edit a file named convert-tux-rgb565.py:
nano convert-tux-rgb565.py
🟡 You don’t need to understand this, it’s here for curious and brevity, how it works is outside the scope of this guide. Just copy and paste into convert-tux-rgb565.py
#!/usr/bin/env python3

# convert-tux-rgb565.py

import sys
import struct

def convert_rgb_to_rgb565(input_stream):
    # Open the file "tux565.rgb" for writing as a binary file ("wb")
    with open("tux565.rgb", "wb") as file:
        while True:
            # Read 3 bytes (1 RGB pixel), With 8-bit depth from ImageMagick we read 3, 8-bit values, or 3 bytes.
            rgb_data = input_stream.read(3)

            # Break out of the loop if we don't have a full pixel (end of file)
            if len(rgb_data) < 3:
                break

            # Extract RGB components,
            r, g, b = rgb_data[0], rgb_data[1], rgb_data[2]

            # Convert to RGB565 format
            rgb565 = ((r >> 3) << 11) | ((g >> 2) << 5) | (b >> 3)

            # Write RGB565 as 16-bit little-endian
            file.write(struct.pack('<H', rgb565))

if __name__ == "__main__":
    # Open the previously converted file "tux.rgb" for reading as a binary file ("rb")
    with open("tux.rgb", "rb") as file_buffer:
        convert_rgb_to_rgb565(file_buffer)
This script parse the resized 🟥🟩🟦rgb image we converted with the ImageMagick command and restructure the 8-bit per color image into the desired 5/6/5 format. If everything went well then you should now be able to see the tux565.rgb file:
ls tux565.rgb
If everything went well, you should be able to cat the contents of tux565.rgb into the framebuffer at /dev/fb0:
cat tux565.rbg > /dev/fb0
You should see that famous little penguin on your display:
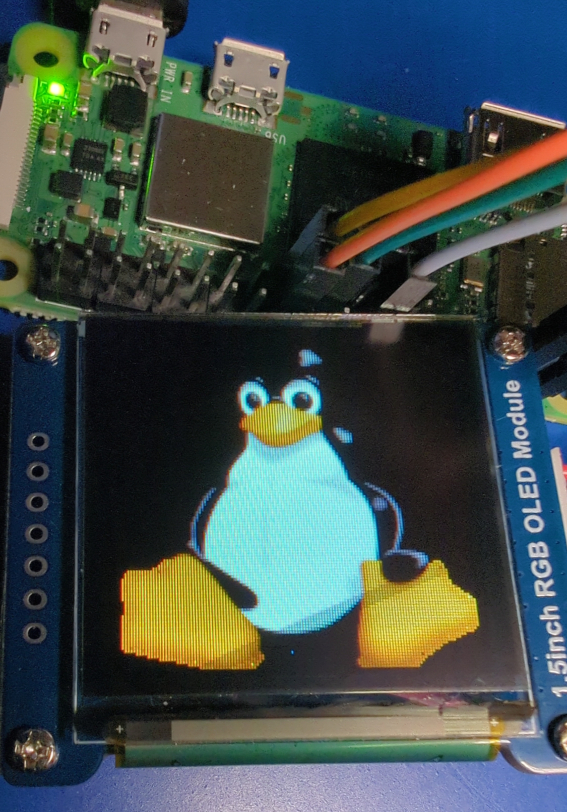
Congrats! Next I’ll get into how to expand on this and get a more flexible program using bash pipelines so you can can use different images and even basic video. For now, the names for the input image:tux.png and intermediate image:tux.rgb are hardcoded, but you can swap it for any image, just name it tux.png and make sure it really is a png!